1. Downloading VMware
Visit https://www.vmware.com/ to download VMware. However, you may encounter broken links, as shown below.
2. Direct Download Link
You can access the installation file directly via the following link:
VMware-player-17.5.2-23775571.exe.tar
CDS Repository - /var/www/public/stage/session-120/cds/vmw-desktop/player/17.5.2/23775571/windows/core
softwareupdate.vmware.com
3. Extracting and Running the Installer
After downloading, extract the files and run the installation file by double-clicking it.
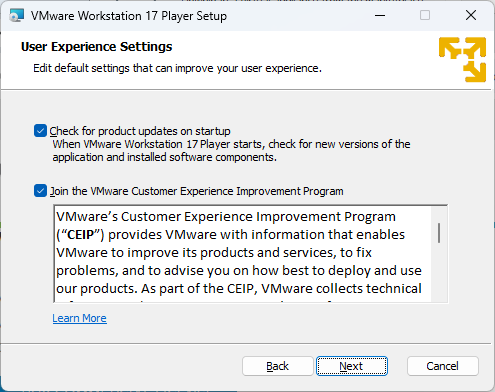
4. Installation Setup
The setup window will appear. Click Next to proceed through the installation steps.
5. Free or Licensed Use
Once the installation is complete, launching VMware will show an option to use it for free or enter a license key. (Since I am not using it commercially, I selected the free option and clicked Continue.)
6. Completion Screen
The installation will finish with a screen like this. Click Finish to complete the setup.
7. Launching VMware
The VMware interface will appear, as shown below.
8. Downloading Ubuntu
Visit the official Ubuntu website at https://ubuntu.com/.
- Navigate to Get Ubuntu -> Download Ubuntu Desktop.
- Click Download 24.04 LTS (file size: ubuntu-24.04-desktop-amd64.iso – 5.69 GB).
9. Installing Ubuntu in VMware
After downloading, open VMware and click Create a New Virtual Machine.
10. Selecting the ISO File
Choose the ISO file you just downloaded.
11. Setting User Information
Set the Full Name, Username, and Password as shown below, then click Next.
12. Configuring Virtual Machine Settings
Set the installation path, disk allocation, and review the final hardware specifications for your virtual machine.
13. Starting the Installation
Click Finish to start the Ubuntu installation. If an update screen appears, click Download and Install.
Note: If a black screen or flickering occurs during or after installation, refer to this guide: Ubuntu Black Screen Fix.
14. Setting Up Ubuntu
- Choose Language (e.g., Korean).
- Configure Accessibility in Ubuntu.
- Select the Keyboard Layout.
- The Network Connection screen will appear.
15. Choosing Installation Type
Click Continue through the subsequent steps until you see a screen asking whether to install Ubuntu or try it out. Choose Install Ubuntu.
16. Installation Modes
Select either Interactive Installation or Automated Installation:
- Interactive Installation: Guide-assisted setup where you provide installation details step by step.
- Automated Installation: Advanced option using an autoinstall.yaml file to automate the process.
I chose Interactive Installation and clicked Next.
17. Basic or Extended Installation
Choose between Default Installation (basic packages) or Extended Installation (includes utilities). I selected Extended Installation.
18. Additional Programs
Install additional recommended programs by selecting both options and clicking Next.
19. Disk and Account Setup
- Choose Erase Disk and Install Ubuntu and click Next.
- Set up your account name and password.
20. Final Installation
Once all settings are complete, click Install to begin.
21. Installation Progress
During installation, you can click the square icon in the bottom right corner to view installation details.
22. Completing Installation
After installation is finished, you will see the Ubuntu startup screen. Your Ubuntu setup is now complete!
'IT' 카테고리의 다른 글
| DeepSeek: The Rising Chinese AI Startup Reshaping the Industry (1) | 2025.01.30 |
|---|---|
| 량원펑 딥시크 성능 기술 내용 요약 (0) | 2025.01.30 |
| Windows 11 installation skip network connection step (0) | 2025.01.18 |
| 양자 컴퓨터 기초 개념 기존 컴퓨터와 차이 큐비트(Qubit) (1) | 2025.01.12 |
| 윈도우 11 마우스 우클릭 메뉴 복원 윈도우 10 스타일 변경 (0) | 2024.12.17 |


